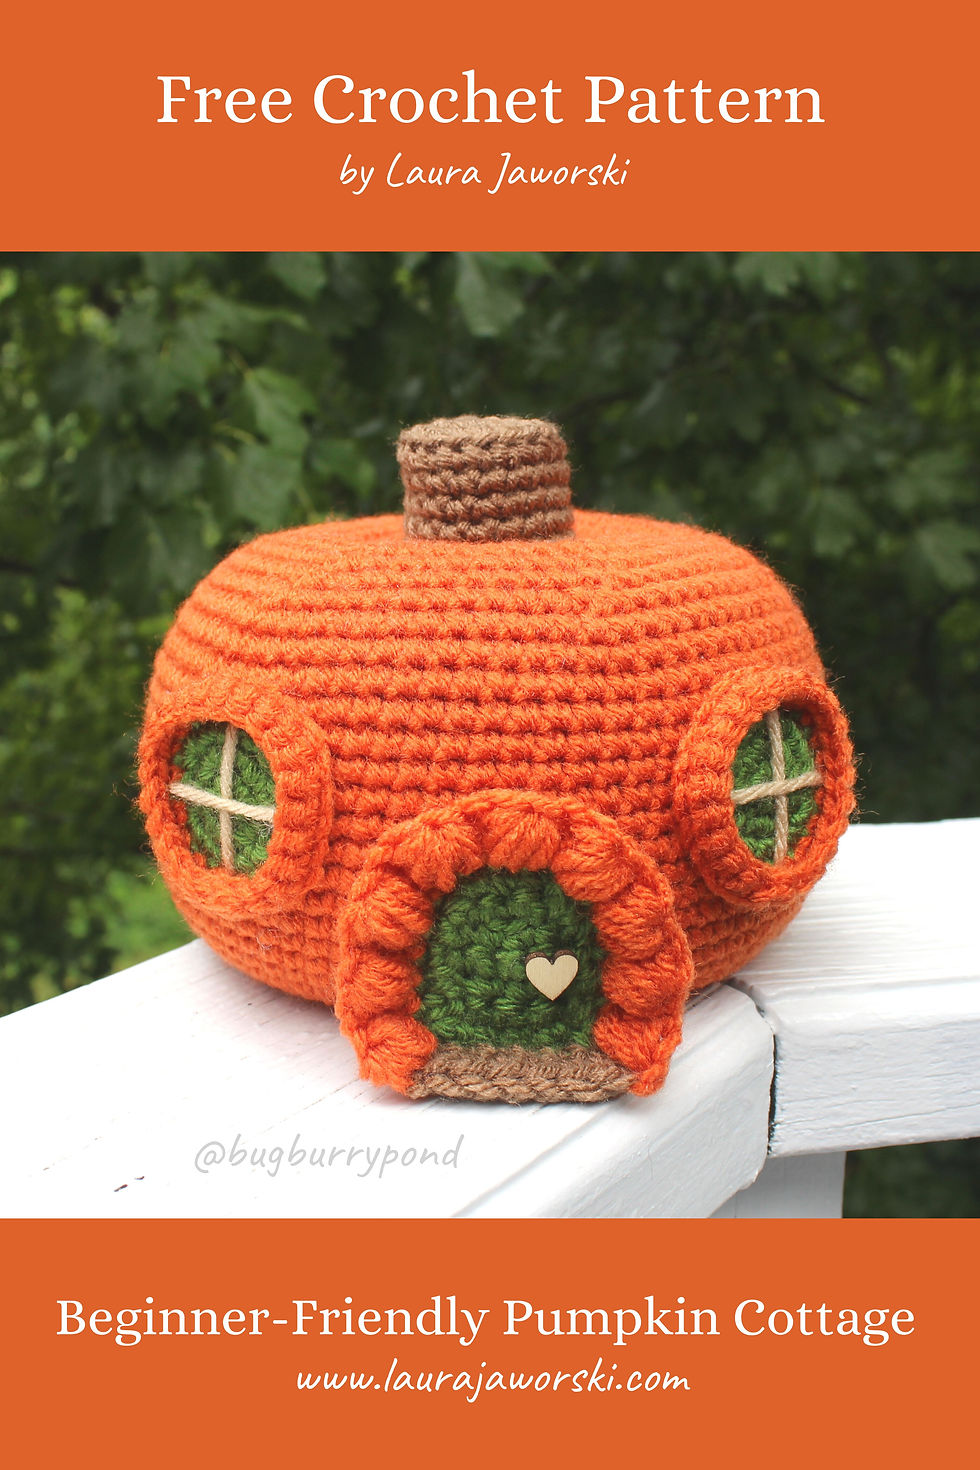
The Pumpkin Cottage Free Crochet Pattern by Laura Jaworski (@bugburrypond) 🎃
- Sep 14, 2022
- 10 min read
Updated: Oct 8, 2025
This pumpkin cottage stands approximately 5 inches tall and is suitable for all crocheters. I hope you enjoy this pattern, and if you post pictures, please hashtag #laurajaworski & tag me @bugburrypond so I can see & share your creations.
You can find all of my free crochet patterns here.
Happy crocheting & happy autumn! 🎃

Skill Level: Easy
Size:
This cottage stands approximately 5 inches tall when made with a size 4 hook and worsted weight yarn.
Supplies:
Worsted weight yarn (orange, green, brown, tan)
4.0 mm hook
Needle for sewing
Extra-long needle (optional but recommended)
Polyester or other stuffing
Stitch marker, safety pin, or small piece of yarn to count rounds
Scissors
Hot glue (optional)
Push pins (optional)
Miniature wooden cutout (optional)
Abbreviations:
MC = Magic circle
St = Stitch
Sc = Single crochet stitch
Hdc = Half double crochet stitch
2tog = Crochet two together, also known as decrease (invisible decrease preferred)
Ss = Slip stitch
Puff = Puff stitch (see pattern notes)
Rep = Repeat
Ch1 = Chain one
BLO = Back loop only
FLO = Front loop only
RS = Right side (the front side of your work)
F/o = Finish off

The Leaves Are Changing; I Feel Poetry in the Air, now available on Amazon!
A note about the magic circle:
Also known as a magic loop or magic ring. If you prefer not to use a magic circle, simply create a slip knot, chain two, and begin by placing your first round of stitches into the first chain. Pull tightly on your tail to close the gap and continue with the pattern as written. Once you have worked a few more rounds, weave your yarn tail back and forth on the underside to secure your piece and close any remaining gap.
A note about working in a spiral vs. joined rounds:
The pumpkin portion of this cottage is worked in a spiral which means that each round continues into the next without a slip stitch and chain.
A note about counting stitches: Using a stitch marker, safety pin, or small piece of yarn to mark the first stitch of each spiral round will help you track your progress. Move the marker as you complete each round.

A note about BLO & FLO:
For the back loop only round, you will work all of your stitches into the back loop of each stitch. For the front loop only round, you will work all of your stitches into the front loop of each stitch. For all other rounds, work into both loops of each stitch.
A note about gauge:
The size of your cottage will be determined by a number of factors; your hook, the yarn you’ve chosen, and even how tightly or loosely you crochet can significantly change the size of your work.
A note about reading the pattern:
Before beginning a pattern, it helps to read through the abbreviations list. If you need help with a technique, refer to a written or video tutorial, or keep a crochet book handy. Below is a round from the pattern, followed by a detailed description of the instructions.
Rnd 4: 2sc then 2sc in the next st, rep (24)
Beginning round four, add one single crochet into each of the next two stitches. Add two single crochet stitches in the following stitch. Repeat the pattern of one single crochet in each of the next two stitches followed by an increase until you reach the end of round four. There should be 24 stitches in your completed round.

Click here for The Pumpkin Bear Free Crochet Pattern 🎃
A note about the puff stitch:
To crochet the puff stitch for this pattern, yarn over, insert your hook into the stitch space, yarn over, pull up a loop, *yarn over, insert hook in same stitch, yarn over, pull up a loop* 3 times (9 loops on hook), yarn over and draw through all loops on hook. Complete each puff stitch with a chain one.
A note about the standing single crochet stitch:
To complete a standing single crochet stitch, begin by placing a slip knot on your hook. Insert your hook into the stitch space, yarn over & pull up a loop, yarn over again & pull through both loops on your hook to complete the stitch.
A note about the invisible finish technique:
For the invisible finish technique, complete the last stitch of the pattern. Snip your yarn, leaving a tail long enough for sewing. Pull the loop on your hook, drawing the snipped yarn tail free. Next, thread the yarn tail onto your needle and bring it through both loops of the stitch following the next stitch. Bring your yarn tail through the back loop of the last stitch of your final round, pulling until you’ve created a v that is comparable in size to the rest of your stitches. Weave your yarn tail on the backside of your piece to secure.

Now let’s get started!
Pumpkin (beginning at the bottom, with orange yarn):
Rnd 1: MC with 6sc (6)
Rnd 2: 2sc in each st (12)
Rnd 3: 1sc then 2sc in the next st, rep (18)
Rnd 4: 2sc then 2sc in the next st, rep (24)
Rnd 5: 3sc then 2sc in the next st, rep (30)
Rnd 6: 4sc then 2sc in the next st, rep (36)
Rnd 7: 5sc then 2sc in the next st, rep (42)
Rnd 8: 6sc then 2sc in the next st, rep (48)
Rnd 9: 7sc then 2sc in the next st, rep (54)
Rnd 10: 8sc then 2sc in the next st, rep (60)
Rnd 11: 9sc then 2sc in the next st, rep (66)
Rnd 12: 10sc then 2sc in the next st, rep (72)
Rnd 13: 11sc then 2sc in the next st, rep (78)
Rnd 14-29: 1sc in each st (78)
Rnd 30: 11sc then 2tog, rep (72)
Rnd 31: 10sc then 2tog, rep (66)
Rnd 32: 9sc then 2tog, rep (60)
Rnd 33: 8sc then 2tog, rep (54)
Rnd 34: 7sc then 2tog, rep (48)
Rnd 35: 6sc then 2tog, rep (42)
Begin stuffing your pumpkin; you can continue stuffing as you close. Stuff firmly but not so firmly that it stretches the stitches.
Rnd 36: 5sc then 2tog, rep (36)
Rnd 37: 4sc then 2tog, rep (30)
Rnd 38: 3sc then 2tog, rep (24)
Rnd 39: 2sc then 2tog, rep (18)
Rnd 40: 1sc then 2tog (12)
Rnd 41: 2tog x 6 (6)
F/o, leaving an extra-long tail for sewing. Weave the tail around the front loops of the six remaining stitches and pull to close; knot to secure.
You will now cinch the top middle of your pumpkin to the bottom middle of your pumpkin (see photos). Using a long needle, bring the yarn tail from the top center of your pumpkin to the bottom center of your pumpkin and pull tightly, cinching to your desired shape. Next, insert your needle one stitch over from the bottom center and loop the yarn tail from the bottom center back up to the top center, pulling tightly. Repeat this step until your pumpkin is cinched and well secured. Bring your yarn tail out of a stitch on the bottom of the pumpkin; do not snip.

Pumpkin Stem (beginning at the top, with brown yarn):
Rnd 1: MC with 6sc (6)
Rnd 2: 2sc in each st (12)
Rnd 3: 1sc then 2sc in the next st, rep (18)
Snip your yarn & f/o using the invisible finish technique; weave your yarn tails on the back of your piece to secure. Next, attach your brown yarn to the back loop of the first stitch of rnd 3 with a standing single crochet stitch (see pattern notes) & continue as follows:
Rnd 4: BLO 1sc in each remaining st (18)
Rnd 5-9: 1sc in each st (18)
F/o, leaving an extra-long tail for sewing.
Note: if you prefer not to use a standing single crochet stitch, you can attach your yarn to the back loop of the first stitch of rnd 3 with a ch1 & continue with the pattern as written. You can also go straight from rnd 3 to rnd 4 (with or without a ch1 between rounds, depending on your preference) without snipping your yarn. Just keep in mind that the transition will create a slight dip in your work.

Door (beginning at the bottom, with green yarn):
Row 1: Ch 5, sc in the back bump of the second ch from hook, sc in each back bump to end of row (4)
Row 2-5: Ch1 & turn, sc in each st (4)
Row 6: Ch1 & turn, sc, 2tog, sc (3)
Snip your yarn and f/o; weave your yarn tails in the back of your piece, covering any noticeable gaps.
You will now work a border around the sides and top of your door (see photos). Attach your green yarn to the bottom right corner of your door on the RS and ch1. Continue as follows:
Right side, working from bottom to top: Sc in ch1 space, 4sc (5sc)
Top row (working into row 6): 2sc in the first st, 1sc, 2sc in next st (5sc)
Left side, working from top to bottom: 5sc (5sc)
F/o once you reach the bottom left corner; do not work along the bottom row. Note: as there are no workable stitches on the sides of your door, add your stitches wherever you can comfortably fit your hook. You should have 15 border stitches.

Click here for the Sweet Little Pumpkin Free Crochet Pattern.
You will now crochet the front stoop across the 6 bottom stitches of your door. Attach your brown yarn to the front loop of the last st of your border, working in the opposite direction that the door was crocheted (see photos). Note: the first and last stitches in this row will not have a normal FLO space; work wherever you can comfortably fit your hook. Continue as follows:
Row 1: FLO ch1, sc in the same st, 5sc (6)
Row 2: Ch1 & turn, 6hdc (6)
Snip your yarn and f/o; weave your yarn tails in the back of your piece.
You will now add a second border to your door. Attach your orange yarn to the bottom right corner of your door (the first st of your green border) and ch1 (see photos). Continue as follows:
Right side, working from bottom to top: Sc in ch1 space, 4sc (5sc)
Top row: 2sc in first st, 3sc, 2sc in next st (7sc)
Left side, working from top to bottom: 5sc (5sc)
Ch1 & turn your work. BLO *puff, sc* to end of row (17sts)
Snip your yarn and f/o, leaving a long tail for sewing. Using your orange yarn tail, sew the first and last puff stitches of your border to the front stoop. Weave your yarn tails in the back of your door to secure.

Adding a doorknob:
To add a doorknob, carefully stitch or hot glue a bead or small wooden cutout to the door. You can also create a doorknob with a French knot, or by wrapping a strand from back to front until you’ve reached your desired shape & size.
Windows (with green yarn, make two):
Rnd 1: MC with 6sc (6)
Rnd 2: 2sc in each st (12)
Rnd 3: 1sc then 2sc in the next st, rep (18)
Snip your yarn and f/o using the invisible finish technique. You should have 18 stitches.
Rnd 4: Attach your orange yarn to any st and ch1. 2sc then 2sc in the next st, rep (24)
Rnd 5: Ss & ch1. FLO sc in the same stitch, then FLO sc to end of round (24)
Snip your yarn and f/o using the invisible finish technique. Use your yarn tail to even out the bump on the bottom of your window, then weave your yarn tails in the back of your piece to secure.
Next, cut a length of tan yarn & create four equal sections across the front of your window. Weave your yarn tails in the back of your window to secure. If you would like more details on how to embroider the window, click here for The Pine Tree Cottage Free Crochet Pattern.

Completing Your Pumpkin:
If you would like to add a chimney to the top/side of your pumpkin, visit The Mushroom Cottage Free Crochet Pattern for instructions & complete a chimney with orange yarn.
Attaching the stem:
Stuff your stem just enough to hold its shape, making sure not to overstuff. Add a small amount of stuffing to the indent in the top center of your pumpkin, then pin the stem in place. Sew your stem to the pumpkin. When your stem is attached nicely, bring your brown yarn tail out of the same stitch as your orange tail. Knot the two tails together, then hide them in the body of your pumpkin.
Alternatively, follow the below method to attach your stem:
After stuffing and pinning your stem into place, tack the first side of your stem down by bringing your brown yarn tail through the body of your pumpkin and out of a stitch on the bottom. Bring the yarn tail through the same stitch, then up through a stitch on the opposite side of your stem. Continue working your way around the stem in this manner, sewing across one stitch of the stem, out through a random stitch in the bottom of the pumpkin, up through the same stitch, then back up to the next stitch of your stem. When your stem is attached nicely, bring your yarn tail out of the same stitch as your orange tail. Knot the two tails together, then hide them in the body of your pumpkin.

Adding your door & windows to the cottage:
Line your door up on the front of the cottage so that the bottom sits flush with the bottom of the pumpkin. Line your windows up so that they are 1-2 stitches away from the door. Stitch or carefully hot glue your door & windows to the cottage. Note: in order for your door to stand straight, the bottom 1-2 rows will not be attached to the pumpkin.
Complete your cottage by gently shaping the door and pushing all of the puff stitches toward the inside; finger block the windows and overall pumpkin shape.

Click here for all of my free crochet patterns.
And now you’re done! I hope you enjoy this pumpkin cottage & if you post pictures, please hashtag #laurajaworski & tag me @bugburrypond so I can see & share your work! You can find me @bugburrypond on Instagram, Facebook, & Pinterest.
If you have any questions or comments, please feel free to contact me.
Happy crocheting and have a beautiful day 💕
Laura
Please do not post this pattern on another site without written permission.
If you share this pattern, please credit appropriately and link back to the original post.
You may sell completed items made using my free crochet patterns provided you credit me as the designer and provide a link to my website. Alteration of my crochet patterns is strictly prohibited.
Copyright © 2022 Laura Jaworski, The Pumpkin Cottage Free Crochet Pattern.
All Rights Reserved.
“There are no rules to creativity.” ~ Laura Jaworski