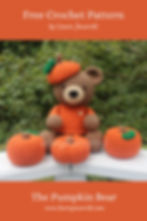
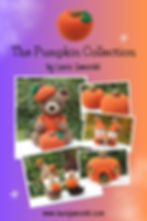
The Pumpkin Bear Free Crochet Pattern by Laura Jaworski (@bugburrypond) 🎃🐻
- Sep 26, 2023
- 13 min read
Updated: Oct 4, 2025
This pumpkin bear stands approximately 10 inches tall and is suitable for all crocheters. I hope you enjoy this pattern, and if you post pictures, please hashtag #laurajaworski & tag me @bugburrypond so I can see & share your creations.
You can find all of my free crochet patterns here.
Happy crocheting & happy autumn! 🎃
Skill Level: Easy
Size:
This bear is approximately 10 inches tall in a sitting position.
Supplies:
Worsted weight yarn (brown, beige, orange, green, black)
4.0 mm hook
Safety eyes (10mm or to your preference)
Needle for sewing
Polyester or other stuffing
Stitch marker, safety pin, or small piece of yarn to count rounds
Scissors
Straight pins
Hot glue (optional)
Black felt (optional)
Abbreviations:
MC = Magic circle (see pattern notes)
St = Stitch
Sc = Single crochet stitch
Ss = Slip stitch
Rep = Repeat
2tog = Crochet two together, also known as decrease (invisible decrease preferred)
FLO = Front loop only
BLO = Back loop only
Ch1 = Chain one
F/o = Finish off
A note about the magic circle:
Also known as a magic loop or magic ring. If you prefer not to use a magic circle, simply create a slip knot, chain two, and begin by placing your first round of stitches into the first chain. Pull tightly on your tail to close the gap and continue with the pattern as written. Once you have worked a few more rounds, weave your yarn tail back and forth on the underside to secure your piece and close any remaining gap.
A note about working in a spiral:
This bear is worked in a spiral which means that each round continues into the next without a slip stitch and chain.
A note about counting stitches:
Using a stitch marker, safety pin, or small piece of yarn to mark the first stitch of each round will help you track your progress. Move the marker as you complete each round.
A note about FLO & BLO:
For the front loop only round, you will work all of your stitches into the front loop of each stitch. For the back loop only round, you will work all of your stitches into the back loop of each stitch. For all other rounds, work into both loops of each stitch.
A note about increasing and decreasing:
For an increase, crochet two stitches in the same stitch. For a decrease, crochet two stitches together, preferably using the invisible decrease method.

The Leaves Are Changing; I Feel Poetry in the Air by Laura Jaworski, now available on Amazon!
A note about reading the pattern:
Before beginning a pattern, it helps to read through the abbreviations list. If you need help with a technique, refer to a written or video tutorial, or keep a crochet book handy. Below is a round from the pattern, followed by a detailed description of the instructions.
Rnd 4: 2sc then 2sc in the next st, rep (24)
Beginning round four, add one single crochet into each of the next two stitches. Add two single crochet stitches in the following stitch. Repeat the pattern of one single crochet in each of the next two stitches followed by an increase until you reach the end of round four. There should be 24 stitches in your completed round.
A note about the invisible finish technique:
For the invisible finish technique, complete the last stitch of your pattern. Snip your yarn, leaving a tail long enough for sewing. Pull the loop on your hook, drawing the snipped yarn tail free. Next, thread the yarn tail onto your needle and bring it through both loops of the stitch following the next stitch. Bring your yarn tail through the back loop of the last stitch of your final round, pulling until you’ve created a v that is comparable in size to the rest of your stitches. Weave your yarn tail on the backside of your piece to secure.

Now let’s get started!
Bear’s Head & Body (beginning at the top, with brown yarn):
Rnd 1: MC with 6sc (6)
Rnd 2: 2sc in each st (12)
Rnd 3: 1sc then 2sc in the next st, rep (18)
Rnd 4: 2sc then 2sc in the next st, rep (24)
Rnd 5: 3sc then 2sc in the next st, rep (30)
Rnd 6: 4sc then 2sc in the next st, rep (36)
Rnd 7: 5sc then 2sc in the next st, rep (42)
Rnd 8: 6sc then 2sc in the next st, rep (48)
Rnd 9: 7sc then 2sc in the next st, rep (54)
Rnd 10-17: 1sc in each st (54)
Add your safety eyes between rounds 12 & 13 with 8 stitches between.
Rnd 18: 7sc then 2tog, rep (48)
Rnd 19: 6sc then 2tog, rep (42)
Rnd 20: 5sc then 2tog, rep (36)
Rnd 21: 4sc then 2tog, rep (30)
Begin stuffing the head; you can continue stuffing as you go.
Rnd 22: 3sc then 2tog, rep (24)
Switch to orange yarn. You can change yarn colors as many times as you like from rnd 23 to rnd 36 to create stripes/customize your bear’s sweater.
Rnd 23: 3sc then 2sc in the next st, rep (30)
Rnd 24: 1sc in each st (30)
Rnd 25: 4sc then 2sc in the next st, rep (36)
Rnd 26: 1sc in each st (36)
Rnd 27: 5sc then 2sc in the next st, rep (42)
Rnd 28: 1sc in each st (42)
Rnd 29: 6sc then 2sc in the next st, rep (48)
Rnd 30: 1sc in each st (48)
Rnd 31: 7sc then 2sc in the next st, rep (54)
Rnd 32-35: 1sc in each st (54)
Rnd 36: FLO sc in each st (54)
Snip your yarn & f/o using the invisible finish technique.
Switch to brown yarn.
Rnd 37: BLO working into rnd 35, attach your yarn to the first st with a ch1 and sc in the same st, 1sc in each remaining st (54)
Rnd 38-40: 1sc in each st (54)
Rnd 41: 7sc then 2tog, rep (48)
Rnd 42: 1sc in each st (48)
Begin stuffing the body; you can continue stuffing as you close.
Rnd 43: 6sc then 2tog, rep (42)
Rnd 44: 5sc then 2tog, rep (36)
Rnd 45: 4sc then 2tog, rep (30)
Rnd 46: 3sc then 2tog, rep (24)
Rnd 47: 2sc then 2tog, rep (18)
Rnd 48: 1sc then 2tog, rep (12)
Rnd 49: 2tog x 6 (6)
Snip your yarn. Pull your yarn tail free, then weave your yarn tail through the front loops of the six remaining stitches and pull to close. Weave your yarn back and forth or knot to secure and hide the yarn tail inside the body.

Bear’s Ears (with brown yarn, make two):
Rnd 1: MC with 6sc (6)
Rnd 2: 2sc in each st (12)
Rnd 3: 1sc then 2sc in the next st, rep (18)
Rnd 4: 2sc then 2sc in the next st, rep (24)
Rnd 5-6: 1sc in each st (24)
Rnd 7: 2sc then 2tog, rep (18)
F/o using the invisible finish technique; leave a long tail for sewing.
Bear’s Snout (with beige yarn):
Rnd 1: MC with 6sc (6)
Rnd 2: 2sc in each st (12)
Rnd 3: 1sc then 2sc in the next st, rep (18)
Rnd 4: 2sc then 2sc in the next st, rep (24)
Rnd 5-6: 1sc in each st (24)
F/o using the invisible finish technique; leave a long tail for sewing.

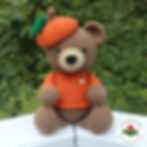
Embroidering the nose (see photos):
To embroider the nose, thread a long strand of black yarn onto your needle. Beginning at the back of the snout, bring your yarn through to the front, between rounds 1 & 2; this will be the bottom of your nose. Next, bring your yarn up between rounds 3 & 4, and to the back of the snout. Continue looping through your initial bottom point and fanning your stitches out in the shape of a triangular nose. Once you’ve filled out the nose nicely, add two or three stitches along the top of the nose to complete the shape.
If you would like to add more detail, bring your yarn to the front a length below the nose, then up through the same stitch at the bottom of the nose. You can also add a half or full smile. Once you’ve completed your nose & mouth, weave your yarn back and forth to secure or knot the yarn loosely in the back of the snout, making sure not to warp the shape of your crochet.
You can get creative with the nose and make it bigger, smaller, or shape it differently. You can also use felt, a button, a crocheted piece, or a safety nose.


Click here for The Teddy Bear Free Crochet Pattern PDF.
Bear’s Eyelids (optional, with brown yarn, make two):
Ch5, working into the back bumps of the ch: ss in the 2nd ch from hook, 2hdc, ss.
F/o, leaving a long tail for sewing.
Alternatively, use black or brown yarn or crochet thread to create eyelids or eyebrows.

Bear’s Hand & Arm (beginning with brown yarn, make two):
Rnd 1: MC with 6sc (6)
Rnd 2: 2sc in each st (12)
Rnd 3: 1sc then 2sc in the next st, rep (18)
Rnd 4-6: 1sc in each st (18)
Rnd 7: 1sc then 2tog, rep (12)
Switch to orange yarn.
Begin stuffing your hand; you can continue stuffing as you go. Stuff the arm lightly.
Rnd 8-18: 1sc in each st (12)
Snip your yarn & f/o; leave a long tail for sewing.

Bear’s Sleeve Cuff (optional, with orange yarn, make two):
Ch12 & f/o leaving a tail long enough for sewing. You can add or subtract chains as needed.

Click here for the Sweet Little Pumpkin Pattern + PDF 🎃
Bear’s Foot & Leg (with brown yarn, make two):
The foot can be made in one solid color or with a lighter color for the footpad. If you would like to make a footpad, begin with beige yarn (or whatever color you choose), crochet up to round 4, then switch to brown. Continue with brown for the rest of the foot & leg. For a cleaner look, snip your yarn & f/o using the invisible finish technique at the end of round 4. Begin round 5 by attaching your brown yarn to the first stitch with a ch1, place your first sc in the same stitch, then continue with the pattern as written.
Rnd 1: MC with 6sc (6)
Rnd 2: 2sc in each st (12)
Rnd 3: 1sc then 2sc in the next st, rep (18)
Rnd 4: 2sc then 2sc in the next st, rep (24)
Rnd 5: 3sc then 2sc in the next st, rep (30)
Rnd 6-7: 1sc in each st (30)
Rnd 8: 2tog x 4, sc to end of round (26)
Rnd 9: 2tog x 2, sc to end of round (24)
Rnd 10: 2sc then 2tog, rep (18)
Stuff the foot, shaping the heel and toes so they’re nicely rounded. Lightly stuff the leg as you crochet rounds 11-17. You may want to leave the last round or two unstuffed, depending on how you plan to attach the legs (see instructions below). If you plan to attach the legs on the side of your bear in a standing position, you may want to add an additional round or two of sc, for a total of 18+ rounds.
Rnd 11-17: 1sc in each st (18)
Snip your yarn & f/o; leave a long tail for sewing.


Bear’s Pumpkin Hat (beginning with brown yarn):
Rnd 1: MC with 6sc (6)
Rnd 2-5: Sc in each st (6)
Rnd 6: 2sc in each st (12)
Switch to orange yarn; stuff the stem lightly with your brown yarn tail.
Rnd 7: 1sc then 2sc in the next st, rep (18)
Rnd 8: 2sc then 2sc in the next st, rep (24)
Rnd 9: 3sc then 2sc in the next st, rep (30)
Rnd 10: 4sc then 2sc in the next st, rep (36)
Rnd 11: 5sc then 2sc in the next st, rep (42)
Rnd 12: 6sc then 2sc in the next st, rep (48)
Rnd 13-15: 1sc in each st (48)
Rnd 16: 6sc then 2tog, rep (42)
Rnd 17: 5sc then 2tog, rep (36)
Rnd 18: 4sc then 2tog, rep (30)
Rnd 19: 3sc then 2tog, rep (24)
Stuff the hat lightly; the top should be gently domed like a pumpkin, but it should still mold to the bear’s head. You can continue stuffing as you close.
Rnd 20: 2sc then 2tog, rep (18)
Rnd 21: 1sc then 2tog, rep (12)
Rnd 22: 2tog x 6 (6)
Snip your yarn, leaving a long tail for sewing. Pull your yarn tail free, then weave your yarn tail through the front loops of the six remaining stitches and pull to close. Weave your yarn back and forth or knot to secure; do not snip your yarn. If you plan to hot glue the hat to the bear, do not leave a long tail for sewing & snip your remaining yarn once the hat is complete.


Putting It All Together
Attaching the sleeve cuffs:
Wrap your chained piece around the hand/arm between rounds 7 & 8 so the color change is covered. Tie the yarn tails at the back, then stitch the cuff down around the arm using one of the tails. Weave the tails in the back of the arm to secure.

Click here for The Teddy Bear Free Crochet Pattern + PDF 🐻
Attaching the legs:
The legs can be attached in several directions. You can position the legs so your bear is in a sitting position (with the legs facing forward or outward), or you can attach them on the bottom or the side of the body in a standing position. You can also choose whether to flatten the top of the leg by pressing the last round together before attaching to the body, or you can stitch the legs to the body with the rounded leg shape.
To attach the legs in a sitting position, line the legs up so they’re flush with the bear’s bottom on a flat surface; this should be around round 45 (see photos). When you’re happy with how the legs look, pin them into place and sew the legs to the body. Finally, bring both yarn tails out of the same stitch on the bottom of the bear, tie the tails together, & hide them in the body.
To attach the legs in a standing position, pin both legs to the bottom or the side of the body. Sew the legs to the body then bring both yarn tails out of the same stitch, tie the tails together, & hide them in the body.
See The Frog of Bugburry Pond, Frog Free Crochet Pattern for more how-to pics on attaching the legs + examples of standing positions.

Attaching the arms:
The arms can be attached in several directions (see photos). To begin, position the top of the arms with the top of round 25, one arm on each side of the body. From here you can decide if you’d like the arms facing downward, angled, or reaching up & out. Position slightly backward for a shorter arm or slightly forward for a longer arm. Note: positioning up & out will allow you to attach items between the hands, which I will have available in future patterns.
Once you’ve decided on the position, pin both arms into place. Using your dark brown yarn tails, stitch the arms to the body, making sure the stitches are secured all the way around. Once the arms are nicely attached, bring both yarn tails out of the same stitch on the back of the body, knot the tails & hide them in the body.


Click here for The Pumpkin Gnome Free Crochet Pattern.
Attaching the ears (see photos):
To attach the ears, press them flat then pin each ear to the top center of your bear’s head, starting at round 5. Once you have them positioned, stitch the ears into place, then bring both yarn tails out of the same stitch on the back of the head, tie the tails together, & hide them in the head.
Attaching the snout (see photos):
Stuff the embroidered snout lightly then pin it into place so that the top is between rounds 11 & 12, between the eyes. Next, stitch the snout into place, then bring your yarn tail out of a stitch on the back of the head. Weave your yarn tail back and forth a few times through the stitch holes to secure. You can also leave a single yarn tail free (left over from the ears or eyebrows) to tie a knot with, then hide the yarn tail inside the head. Alternatively, you can create a small knot at the bottom of your snout before hiding the yarn tail.

Attaching the eyebrows (see photos):
To add your eyebrows, pin them into place over the eyes. I like to add them to the side so the bear has a happy look; you can play around with the position to see what you like. Once you have the eyebrows in place, add a few stitches in and out of each piece to secure, then bring your yarn tails out of a stitch on the back of the head, tie the tails together, & hide them in the head. Alternatively, carefully hot glue the eyebrows to the bear.
Attaching the vine to the hat:
Thread your yarn tail onto your needle and bring it through the base of the stem of your pumpkin hat. Stitch the vine to the hat, making sure not to warp the shape of your crochet, then bring it out of a stitch on the bottom of the hat. Weave the tail back and forth or knot to secure; snip the excess.
Attaching the hat:
Begin by pinning the hat into place on the side of the bear’s head. Next, thread your yarn tail onto your needle and stitch the hat to the bear’s head. Bring the yarn tail out of a stitch hole on the back of the head, weave it in and out of the stitch holes to secure, then snip the excess. You can leave a yarn tail free from the ears or snout to knot the hat tail with if desired.
Alternatively, carefully hot glue the hat to your bear’s head.
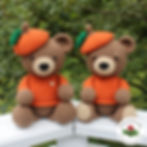
Decorating your bear’s sweater:
Add buttons, wooden cutouts, a crocheted pumpkin, or anything else you like to decorate your bear’s sweater.
Click here for all of my free crochet patterns.
And now you’re done! I hope you enjoy this pumpkin bear & if you post pictures, please hashtag #laurajaworski & tag me @bugburrypond so I can share your work! You can find me @bugburrypond on Instagram, Facebook, & Pinterest.
If you have any questions or comments, please feel free to contact me.
Happy crocheting and have a beautiful day. 💕
Laura
Please do not post this pattern on another site without written permission.
If you share this pattern, please credit appropriately and link back to the original post.
You may sell completed items made using my free crochet patterns provided you credit me as the designer and provide a link to my website wherever the items are sold. Alteration of my crochet patterns is strictly prohibited.
Copyright © 2023 Laura Jaworski,
The Pumpkin Bear Free Crochet Pattern.
All Rights Reserved.
"Inhale possibility, exhale creativity." ~ Laura Jaworski ✨
Click here for The Teddy Bear Free Crochet Pattern PDF.
Click here for the Sweet Little Pumpkin Free Crochet Pattern PDF.