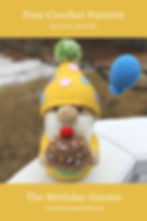
The Birthday Gnome Free Crochet Pattern by Laura Jaworski (@bugburrypond) 🎈
- Mar 16, 2022
- 8 min read
Updated: Jan 10, 2024
This birthday gnome stands approximately 8 inches tall and is suitable for all crocheters. I hope you enjoy this pattern, and if you post pictures, please hashtag #laurajaworski & tag me @bugburrypond so I can see & share your creations.
The downloadable PDF for the body of this gnome can be found here.
You can find all of my free crochet patterns here.
Happy crocheting & Happy Birthday! 🎈

Skill Level: Easy
Size:
This gnome stands approximately 8 inches tall when made with a size 4 hook and worsted weight yarn.
Supplies:
Worsted weight yarn (tan, white, yellow, red, green, brown, purple)
4.0 mm hook
Safety eyes (6mm, or to your preference)
Needle for sewing
Polyester or other stuffing
Stitch marker, safety pin, or small piece of yarn to count rounds
Felt
Craft wire or craft dowel
Pompom
Scissors
Glue
Abbreviations:
MC = Magic circle
St = Stitch
Sc = Single crochet
Ss = Slip stitch
Rep = Repeat
Inc = Increase
2tog = Crochet two together, also known as decrease
Ch1 = Chain one
F/o = Finish off
A note about the magic circle:
Also known as a magic loop or magic ring. If you prefer not to use a magic circle, simply create a slip knot, chain two, and begin by placing your first round of stitches into the first chain. Pull tight on your tail to close the gap and continue with the pattern as written. Once you have worked a few more rounds, weave your yarn tail back and forth on the underside to secure your piece and close any remaining gap.
A note about working in a spiral:
This little gnome is worked in a spiral which means that each round continues into the next without a slip stitch and chain. You will not turn your work while making this project.

Click here for The Cupcake Pin Cushion Free Crochet Pattern.
A note about counting stitches:
Using a stitch marker, safety pin, or small piece of yarn to mark the first stitch of each round will help you track your progress. Move the marker as you complete each round.
A note about BLO:
For the back loop only round, you will work all of your stitches into the back loop of each stitch. For all other rounds, work into both loops of each stitch.
A note about increasing and decreasing:
For an increase, crochet two stitches in the same stitch. For a decrease, crochet two stitches together, preferably using the invisible decrease method.
A note about reading the pattern:
Before beginning a pattern, it helps to read through the abbreviations list. If you need help with a technique, refer to a written or video tutorial, or keep a crochet book handy. Below is a round from the pattern, followed by a detailed description of the instructions.
Rnd 4: 2sc then 2sc in the next st, rep (24)
Beginning round four, add one single crochet into each of the next two stitches. Add two single crochet stitches in the following stitch. Repeat the pattern of one single crochet in each of the next two stitches followed by an increase until you reach the end of round four. There should be 24 stitches in your completed round.
A note about the invisible finish technique:
For the invisible finish technique, complete the last stitch of your pattern. Snip your yarn, leaving a tail long enough for sewing. Pull the loop on your hook, drawing the snipped yarn tail free. Next, thread the yarn tail onto your needle; skip the next stitch and bring your yarn tail through both loops of the following stitch. Bring your yarn tail through the back loop of the last stitch of your final crochet round, pulling until you’ve created a v that is comparable in size to the rest of your stitches. Weave your yarn tail on the backside of your piece to secure.

Now let’s get started!
Head & Body (beginning at the top, with tan yarn):
Rnd 1: MC with 6sc (6)
Rnd 2: 2sc in each st (12)
Rnd 3: 1sc then 2sc in the next st, rep (18)
Rnd 4: 2sc then 2sc in the next st, rep (24)
Rnd 5: 3sc then 2sc in the next st, rep (30)
Rnd 6: 4sc then 2sc in the next st, rep (36)
Rnd 7-12: 1sc in each st (36)
Rnd 13: 4sc then 2tog, rep (30)
Rnd 14: 3sc then 2tog, rep (24)
(Add your safety eyes between rounds 9 & 10 with four stitches between each eye)
Rnd 15: 2sc then 2tog, rep (18)
(Stuff your gnome head, you can continue to stuff & shape as you make the body)
Rnd 16: 1sc then 2tog, rep (12)
(Change to yellow yarn)
Rnd 17: 1sc then 2sc in the next st, rep (18)
Rnd 18: 2sc then 2sc in the next st, rep (24)
Rnd 19: 3sc then 2sc in the next st, rep (30)
Rnd 20: 1sc in each st (30)
Rnd 21: 4sc then 2sc in the next st, rep (36)
Rnd 22-24: 1sc in each st (36)
Rnd 25: 5sc then 2sc in the next st, rep (42)
Rnd 26-28: 1sc in each st (42)
Rnd 29: 5sc then 2tog, rep (36)
Rnd 30: 1sc in each st (36)
Rnd 31: 4sc then 2tog, rep (30)
(Begin stuffing your body, you can continue stuffing as you go. Be careful not to overstuff the bottom so your gnome will sit flat)
Rnd 32: 3sc then 2tog, rep (24)
Rnd 33: BLO 2sc then 2tog, rep (18)
Rnd 34: 1sc then 2tog, rep (12)
Rnd 35: 2tog 6 times (6)
Snip your yarn, leaving a long tail for sewing. Weave your yarn tail around the front loops of the six remaining stitches and pull to close. Weave your yarn back and forth or knot to secure, then hide the yarn tail inside the body, pulling up slightly so your gnome sits flat.


Nose (with tan yarn):
Rnd 1: MC with 6sc (6)
Rnd 2: 3sc in the next st, 2sc, rep (10)
Rnd 3: sc in each st (10)
Rnd 4: 2tog 5 times (5)
Snip your yarn, leaving a long tail for sewing. The nose can be lightly stuffed or left flat, to your preference. Weave your yarn tail around the five remaining stitches and pull to close. Weave your yarn back and forth or knot to secure. If you plan to hot glue the nose to your gnome, hide the remaining tail & snip the yarn.

Hands & Arms (beginning with hands, with tan yarn, make two):
Rnd 1: MC with 6sc (6)
Rnd 2-3: 1sc in each st (6)
(Change to yellow yarn, tie tails together & stuff lightly into hands)
Rnd 4-12: 1sc in each st (6)
F/o, leaving a long tail for sewing. Do not stuff the arms.
Sleeve Cuffs (with yellow yarn, make two):
Ch7, f/o leaving a long tail for sewing. You can add or subtract a chain if needed.
For thicker sleeve cuffs:
Chain 8, sc in second chain from the hook, sc to end of row (7)
F/o, leaving a long tail for sewing.
Hat (with yellow yarn):
Rnd 1: MC with 4sc (4)
Rnd 2: 1sc then 2sc in the next st, rep (6)
Rnd 3: 1sc then 2sc in the next st, rep (9)
Rnd 4: 2sc then 2sc in the next st, rep (12)
Rnd 5: 1sc in each st (12)
Rnd 6: 1sc then 2sc in the next st, rep (18)
Rnd 7: 1sc in each st (18)
Rnd 8: 2sc then 2sc in the next st, rep (24)
Rnd 9: 1sc in each st (24)
Rnd 10: 3sc then 2sc in the next st, rep (30)
Rnd 11: 1sc in each st (30)
Rnd 12: 4sc then 2sc in the next st, rep (36)
Rnd 13-15: 1sc in each st (36)
Rnd 16: 5sc then 2sc in the next st, rep (42)
Rnd 17-19: 1sc in each st (42)
Rnd 20: Ss each st around (42)
Snip your yarn. Complete your hat using the invisible finish technique, then weave your yarn tail on the underside of the hat to secure.

Click here for The Little Gnome Free Crochet Pattern 🍄
Cupcake (beginning with brown yarn):
Rnd 1: MC with 6sc (6)
Rnd 2: 2sc in each st (12)
Rnd 3: 1sc then 2sc in the next st, rep (18)
Rnd 4: 2sc then 2sc in the next st, rep (24)
Rnd 5-7: 1sc in each st (24)
Rnd 8: FLO 3ss, 2hdc in the next st, rep (30)
Snip your yarn & f/o using the invisible finish technique; weave your yarn tail on the inside of your cupcake to secure.
(Change to green yarn)
Rnd 9: BLO 1sc in each st of rnd 7 (24)
Rnd 10: 1sc in each st (24)
Rnd 11: 2sc then 2tog, rep (18)
Rnd 12-13: 1sc in each st (18)
(Begin stuffing your cupcake. You can continue stuffing as you close)
Rnd 14: BLO 1sc then 2tog, rep (12)
Rnd 15: 2tog 6 times (6)
Snip your yarn, leaving a long tail for sewing. Weave your yarn tail around the front loops of the six remaining stitches and pull to close. Weave your yarn back and forth or knot to secure, then hide the yarn tail inside the cupcake, pulling up slightly so the bottom sits flat.

Click here for The Most Wonderful Thing Bunny Free Crochet Pattern.
Cherry (with red yarn):
Rnd 1: MC with 6sc (6)
Rnd 2: 1sc in each st (6)
Snip your yarn, leaving a long tail for sewing. Weave your yarn tail around the front loops of the six remaining stitches and pull to close. Weave your yarn back and forth or knot to secure. If you are going to hot glue your cherry to the cupcake, hide the remaining tail and snip the yarn.
Balloon (with purple yarn);
Rnd 1: MC with 6sc (6)
Rnd 2: 2sc in each st (12)
Rnd 3: 1sc then 2sc in the next st, rep (18)
Rnd 4-7: 1sc in each st (18)
Rnd 8: 1sc then 2tog, rep (12)
(Begin stuffing your balloon. You can continue stuffing as you go)
Rnd 9: 1sc in each st (12)
Rnd 10: 2tog 6 times (6)
Rnd 11: 2sc in each st (12)
Snip your yarn. Complete your balloon using the invisible finish technique, then use your yarn tail to stitch the remaining hole closed. If you are using a craft dowel for your balloon string, make sure to leave enough space to fit it into your balloon.
Finishing Your Gnome:
Attaching the beard (see photos):
To add the beard, cut approximately 60 strands of white yarn.
Beginning at the last round of the head, attach 6-8 strands of yarn, centered between the eyes. (To attach a strand, insert your hook behind the post of a stitch, pull the yarn through at its center, then pull the tail ends through the center loop.) Next, add 10+ strands to each round, working your way up to the last round directly under the eyes. For the last round closest to the eyes, leave two stitches free between the eyes so you have a gap to add the nose. Add additional or fewer strands to each round to your preference. If you would like a bushy beard, separate the individual strands of each piece of yarn by hand or with a darning needle.


Attaching the nose:
Stitch or carefully hot glue the nose to your gnome in the beard gap. The top of his nose should be level with the top of round 9.
Attaching the sleeve cuffs:
Wrap your chained piece around the arm between rounds three and four so the color change is covered. Stitch the cuff down around the arm using one of the tails. Hide the yarn tails in the back of the arm to secure.

Attaching the arms:
Attach the arms on either side of your gnome. The top of each arm should be level with the top of round 18.

Finishing touches:
Add sprinkles to your cupcake using different colored strands of yarn. Stitch or carefully hot glue the cherry to the top of your cupcake. Stitch or carefully hot glue the cupcake between your gnome’s hands. Stitch or carefully hot glue a pompom to the top of your gnome’s hat. Hot glue felt polka dots to your gnome’s hat. Attach the balloon to your gnome using a craft dowel or strong craft wire.

Click here for all of my free crochet patterns.
And now you’re done! I hope you enjoy this birthday gnome & if you post pictures, please hashtag #laurajaworski & tag me @bugburrypond so I can see & share your work! You can find me @bugburrypond on Instagram, Facebook, & Pinterest.
If you have any questions or comments, please feel free to contact me.
Happy crocheting and have a beautiful day 💕
Laura
Please do not post this pattern on another site without written permission.
If you share this pattern, please credit appropriately and link back to the original post.
You may sell completed items made using my free crochet patterns provided you credit me as the designer and provide a link to my website. Alteration of my crochet patterns is strictly prohibited.
Copyright © 2022 Laura Jaworski, The Birthday Gnome Free Crochet Pattern.
All Rights Reserved.
“Inhale possibility, exhale creativity.” ~ Laura Jaworski
Click here for 76 Quotes About Light, Love, & the Spiritual Journey ✨